22 The Making of Phon
menace, Sun 25 Jul 2010
The Making of Phon
by Datsua, Kaktusen and stGenius of PlayPsyCo
Download the pdf here
Introduction
In this article we're going to describe the process of creating the demo «Phon». We're going to show you some pictures from the development process, explain the technology we used and go over some of the problems that had to be tackled along the way.
The technology
The demo is built around deferred shading and Shader model 4.0. The reason being that we wanted to explore what could be done with lots of lights and geometry shaders. You can do deferred shading on SM3 but geometry shaders are only available in SM4 (and greater).
The deferred shading engine supports ambient lights, directional-lights, point-lights, capsule lights and shape-lights. The ambient and directional light types are pretty stock and explanations can be found all over the web. The other light types on the other hand have a few tricks up their sleeve.

The point-lights can have a light shaping cube-map. The cube-map look-up is done with the light direction and it's a nice feature to have when you want to fake light coming out from a sphere with holes, as can be seen in the second scene. The point-lights can also have a 1D color ramp that is sampled from the linear falloff factor (this wasn't used in Phon). The capsule-lights are based on a simple ray/capsule intersection test with linear falloff. This was used in the last scene to light up parts of the cube-streams.

The shape-lights are simple area lights with two 2D shape functions. The shape function parameters are linear interpolated as a function of the area-lights falloff. The interpolated parameters are then used by a super-shape[1] formula to check if the current fragment intersects the shape. The result from the intersection was then used to shape the light. This was used as a light source for the ground level windows in the cathedral scene. But it's really hard to see because of all the darn grass.
The deferred renderer also supports screen-space ambient occlusion, color bleeding and depth-offield. We tried to use these effects with discretion. So their impact on the displayed image is only visible when they are left out.
[1] Paul Bourke's Supershape page: http://local.wasp.uwa.edu.au/~pbourke/geometry/supershape/
Modeling
The 3D-models were created using Lightwave Modeler, and besides the Knife and the Bridge tools, all functions used have probably been around on every version since Lightwaves Amiga days. In fact a few of the objects in Phon are leftovers from earlier projects. The hand in scene 3 was made years ago by following one of the many "how to model a hand"-tutorials available online, so it might have been done on an Amiga, and all the objects in the last scene were made for Revolver. Those objects didn't make the final cut, so we found a place for it here instead. The models worth mentioning that were made for this demo are the cathedral scene, the flower-scene and the Rubics-cube solving robot-thingy.
The cathedral was probably the most time consuming scene to model as we tried approaching it by modeling generic building blocks that fit together and therefore could be used to build the cathedral in Lightwave Layout. We had an idea that this would give a better framerate than using one big object. In the end the gain turned out to be marginal, and so we redid the model as one building which, from a modeling point of view, is much easier.

The method used was googling and looking at a few images of cathedrals, deciding which elements from each cathedral to use, and then making everything from memory to assure a bit of originality where the imagination had to fill in parts and details we could not remember. The flower was the first object created, and it looked like this.
During the design of the first scene we found that one of the flower-parts fit nicely into the first scene as it needed a bit more oomph, and the model was split in two. The leaves were created by deforming a disc. Then a grid of boxes were made and used in a Boolean subtract to divide the leaf into several parts. Next the object was manually subdivided using the knife-tool to get enough divisions for enabling bending of the object. To finish off, a few points were moved manually to get the right shape.
The Rubiks-cube scene came about after watching CubeSTORMER on YouTube. Again the method of just looking at it a few times and then creating something from memory/imagination was used. When doing mechanical objects you can't go wrong if you stick to 45 and 90 degree angles and add a few gears and joints.
To start off, the claws that handle the cube were made and scaled to the right size. Then the mechanics that operate the claws were added. Next it was all about making a skeleton to hold parts together and add more stuff. When it comes to mechanics you can get away with a lot of cloning of parts and the main goal is to make it look complicated, even if most of the parts don't have any actual function.
Textures
Making good looking textures in a short amount of time is hard and it's even harder for coders. Because of this we elected to go scavenger hunting through our previous releases. The textures we liked were then tweaked and combined in Photoshop CS 2. Initially we also wanted to have normalmaps for all the textures, but we ran out of time before any of the normalmaps were created. This was the penalty of doubling as coder and texture-masher instead of adding a dedicated graphics guy to our team.
To keep the color scheme under control we created UnDutchify. This is a C# CLI tool for color matching against a reference image and it was used to keep our textures within a specific color scheme (bluish gray with hints of red, green, and orange).
Music
Regarding music, the wish list was clear from the beginning: the nowadays seemingly ubiquitous dubstep prepared for heavy sync with a tad of industrial. On a personal note, the making of this track was more of an experiment for me. Fiddling with thoughts and techniques on a whole new level rather than doing the perfect production. It was also used to test the seemingly endless amount of power available from the long sought-after, nuclear DSP-reactor UAD-2 Quad.
Disclaimer: Things might get pretty messy and complicated here, but as Phon's music was a cutting edge lab-rat, we decided to write it this way, hoping that any fellow sound geek will find it useful.
Tools of the trade
For the production itself, DAW's used was Ableton Live 8, Propellerheads Reason 4, Record and ReCycle, together with Cycling '74 Max for Live, Native Instruments Kore 2, Komplete, 4, 5 and 6, ReFX Nexus 2, AudioDamage Kombinat multiband distortion, dBlue Glitch, DestroyFX Buffer Override and Antares AutoTune 5. In addition, Universal Audio's UAD-1 Ultra Pak DSP-card with plug-in collection was used, as was a newly apprehended UAD-2 Quad card. Extra plug-ins used were Moog Multimode Filter, Empiric Labs Fatso and Precision Multiband Dynamics. Steinberg Nuendo 3 was used for stem-mix, and both WaveLab 6 and Ableton Live were used for stem-editing, mixing and mastering.
Hardware used was M-Audio ProFire 2626 audio interface, BX8 monitors and SBX10 sub for monitoring, Presonus Monitor Station and a Røde NT1-A condenser mic with pop-filter. M-Audio Keystation Pro-88 keyboard, AKAI APC40 Ableton Live controller and MPD24 drum pad was used for MIDI input, although the APC40 was used as a hands-on mixer and not for any recording.
Structure and arrangement
Usually, a tune is made by first composing a hook, beat, melody or similar, anything that captures the idea of both the title and the sound wanted. Then a skeleton is constructed around this to get a sense of length, sequences, and internal movements to make a list we could follow. At this point, we didn't know much, so the song was started out straight with an intro with a buildup to a beat, without any plan other than a vague feeling. Datsua and stGenius started working on the first draft, and when it was done I added a draft of the first change; the sequence with the acoustic drums. After this, we went back and forth, adding new sync-able parts to the song as design progressed, and working towards a 4 minute length to be humane to ourselves. As the song length was complete, so was the main list of parts, and we started working small while adding more sync points and details both in music and direction. Sometimes parts of the soundtrack inspired changes to the graphics, and vice versa, making it a very fluctuating process.
Sound design
Freezing tracks (a method primarily used to preserve CPU power by bouncing a selected track down to an audio file rather than processing it in real-time) was used extensively together with a similar technique called resampling. Although not for the purpose of preserving resources (not with the UAD-2 Quad in place anyways, baha), but for the control audio editing provides to create effects and edits not so often heard in electronic based music.
Resampling allows the really geeky sound designer to realize all manner of wet, glitchy dreams, and is a must for the surgical OCD-control (yeah, really) this sound geek needs to fulfill his dreams. It's also necessary to generate the kind of red thread effects needed, as there are very few samples from libraries in the soundtrack. Put short, most sounds you hear in Phon are often first created with MIDI and VST or microphone input, then bounced down to audio files and altered. Sometimes frozen files are duplicated to new tracks for adding more effects, further re-sampling, and even more editing. The main bass line has 8 permutations on different tracks happening at different points, all generated from a single MIDI track with N.I. Massive using envelopes, and sometimes entire parts of the song got re-sampled through the master channel, loaded into a MIDI sampler (Lives native Simpler or N.I. Kontakt 4), messed up, cleaned up and then re-sampled to its own audio track for even more editing.
For the order of things, freezing will be referred to as re-sampling throughout this article. The drum loop was the first to be made, and this is one of the few elements in the song that uses samples from a library. The beat was recorded with the MPD24 MIDI drum pad and the native Live Drum Rack with 50% quantization to 16ths to maintain a loose feel, and was recorded 8 bars long to get enough variations and breaks. It was then mixed and "mastered" inside Live with UAD plugs Cambridge EQ, overdriven slightly into the Moog filter, tightened up with the Precision Multiband dynamics, beefed up with Fatso, and mushed for proper loudness into the Precision Limiter. The loop was then re-sampled to an editable audio region on an audio track, and was used throughout the entire song, both for beat variations, and a different kind of effects.
One of the effects is the distorted beat used during the intro and the dubstep parts, where the resampled drum loop was copied to a new track. Distortion was then added with Lives Saturator plugin, adding automation to the base frequency to color different frequency bands seamlessly. This was then again re-sampled, copied to a couple of new tracks, doing a large amount of hand editing to vary from the straight beat itself to reverberated parts, glitch percussion during the dubstep and reverse vinyl-style effects.
The acoustic drums were first recorded with MIDI and N.I. Battery 3 using the MPD24 once again, and as a drummer, it was crucial to keep track of how many arms and legs one can use at the same time to achieve an authentic style. Many musicians tend to just mash in more notes than a single drummer possible could play, and without the proper consideration of the velocity of the hits. Because Battery 3 has more sounds mapped out then what fits on the 16 pads of the MPD24, the drums were recorded in two takes, one to the main beat and one to the cymbals. When satisfied with the beat, it was split up into different tracks to simulate the same mic setup used when recording a real drum kit, with separate tracks to kick drum, top and bottom snare drum, toms, hi-hats, stereo overhead mics, ambience mics in the back of the room and for fun, a mic in a trashcan behind the chair of the drummer. Sounds were soloed in Battery and recorded to their respective tracks, edited and mixed with EQ, reverb and compression to simulate their purpose more faithfully. When the entire kit sounded proper, a separate re-sample of the entire drum kit stem was made for effects and alike. A return bus with hard compression was also set up for New York-style parallel compression, and a lot of glitch editing was made on the tracks themselves to keep it detailed, but anonymous. Most notably is Fibonacci sequence-stuttering on the snare drum and the hi-hats (not the cymbals) to achieve more lovely quirkiness.
The ethnic vocal sounds were made by yours truly chanting in a microphone, routed to AutoTune locked to scale with maximum retune speed, processed on two different tracks processed with Guitar Rig 4, one used during the factory sequence with a wide stereo image obtained by using different distortion modules in the left and right channel, and one with an almost mono distortion and an automated talk wahwah-module with a huge reverb during the tunnel and cathedral sequences. The reason for using a large reverb and almost mono source was to complement the gnarly, mono bassline, which is an instance of Massive using tons of envelopes and performers to move the sound, and Kombinat to f**k it up.
Although the vocal wasn't re-sampled to any effects itself, the return of the reverb was recorded 100% wet to its own track, reversed, time stretched, pitch shifted and otherwise raped to become the voicy reverse fades used throughout the track. The basses were in turn destroyed and re-sampled, where the main method consisted of duplicating the track, adding distortion and filtering in either order, and once again re-sampling this material to new tracks with new effects, typically high pass-filtering, delay and reverb. Using these as my main source of material, very little was added other than some glockenspiel and a very airy synth during the flower sequence. It's also worth mentioning that almost every time re-sampling was done, some form of EQ and compression were added before the actual bouncing, to save time and preserve energy in the mix.
This is all part of attempting to make the song sound "like itself" and not a sequenced library of presets and samples. When the song was mainly finished in its first form, notes were taken on different parts to be edited and glitched up later, and all tracks were exported to single 24 bit 48khz .wav files for mixing in Nuendo. It is important to note that the song sounded quite good at this point, and that the excuse "I'll fix it in the mix and master" rarely works (at least not for me) as everything gets harder as faults catch up.
Editing and mixing
Once imported into Nuendo, some minor editing was done to different elements before the actual mixing began (like editing the return of the reverb channel for those absolutely dead stops) and cleaning up any abnormalities not needed or wanted. All tracks were sorted and routed to group busses, summing drums into one stem, basses into another, leads, pads, FX, and so on. The only exception is that the deepest basses and the low end of the drums who got summed into its own bus. The low range of the drums were separated into its own track at 100hz using the band separation on the Precision Multiband Dynamics, and the top range were treated with the 36db/octave hipass filter on the Cambridge EQ. The EQ was used rather than the remaining bands on the Multiband because the bass part would receive very different processing, and an adjustable cutoff frequency on the high pass filter made it possible to avoid spectral separation. It also allows a higher degree of editable control both in terms of "tightness" and energy distribution in the mix, and in viewing the entire bass range of the song as a single groove rather than just a part of 25 other elements creating the whole. It also makes it easier to remove any rumble in other elements of the track, as the entire low end of the song is controlled in the bass-bus. Therefore, all other tracks were consistently cut with a high pass between 100 and 250hz.

Some musicians might argue that this is the downside of working with entire drum loops rather than keeping e.g. the kick drum on its own track. This might be desirable on some productions, but in this case it opened up possibilities like being able to do spatial editing on the drums without losing a defined bottom.
The song was then mixed in an ordinary fashion, and each of the stems received a light mastering before getting exported back into Live for further mangling.
Stem editing
It is in the stem editing that most of the "global-yetnot" glitching was made, processing and re-sampling the stems once again to both create buildups and releases of energy. This is done because stems are a place in between the single track and a master track, allowing seamless processing. Typical processes used throughout are, automating a reverb dry/wet curve or gradually adding distortion, and stereo widening to the mid band using Kombinat together with a high pass filter sweep towards a break or buildup to create anticipation and dynamics in spatial space. This also sounds tighter because the bass is on its own track, unaffected by the reverb or distortion sweep. At one point, one of these stem-sweeps were even re-sampled to its own track, treated with EQ and time stretched to a fourth of its tempo using Lives Texture audio warp mode to achieve a really grainy sweep. Most of the glitchy parts were done in this manner, mostly by hand editing and with Lives native time stretching and pitch shifting, but also by re-sampling dBlue Glitch and Buffer Override, editing them further for a perfect fit. This is also because automated plugins on master or stem busses tend to change dynamics or gain when self-oscillating, and having re-sampled audio makes it possible to blend, crossfade, and mix processed regions with hand edited ones to avoid the effects and transitions from sounding unnatural.
Mastering
With the first mixing and the stem editing and mixing done, the master channel was then exported into a new Live project without any additional limiting, EQ'ing or compression, and imported to two identical tracks for M/S (mid/side) mastering. This is done by phasing out all the mono content on one bus using reverse panning and phase shifting, and all the stereo on the other, leaving the difference between stereo and mono on two tracks for both editing and processing. The mono track received heavy multiband compression, with emphasis on the bass range. A tight attack value of 29ms was used to emphasize transients, and a release of about 350ms with maximum compression around 9db. The other ranges varied between attack 50-70ms and release from 120-400ms, with an overall maximum compression of around 3db, with the main focus on improving punch in the low and high-mid ranges, reducing mid and low-mid clutter. Fatso was then used to soften the treble with tape compression and warm the track with extra harmonics added from the simulated transformer circuitry.

The track with the stereo differential didn't receive any compression at all, but a very subtle and lush reverb together with a light phase linear EQ boost at 10khz and a minor dip at 3.2khz. The entire track also got a 1.5db gain to really force the stereo image through. After this, both of the tracks had their volume automated on the parts already edited in the stem-session. Adjusting the volume on the mono and stereo material separately, together with changing the entire low end, and making sweeps on the "upper" stems, made it possible to gently drop down to total mono towards a break. Together with "lifting" it by gradually removing the bass by volume fade (rather than frequency sweep because the volume fade sneaks up on you rather then telling you "HERE COMES THE LIFT"), the song moves down to a very low level with almost no bass energy and a mono image, yet defined and clear, to a full wide panorama spectrum with all frequencies blasting off. All of this is 100% transparent, and is mainly possible by using nothing but the song itself to create the effect as opposed to using samples on separate tracks.
After this, at last, the pre-master is exported from Live to WaveLab 6 for minor pan and loudness normalization, some gentle saturation from the Fatso, and maximized using the Precision Limiter and adding dithering before being saved as a 16-bit master .wav file and converted into the final MP3.
Morale
Although a bunch of really cool plug-ins were used on this track, it is important to note that the song, for most ears, was finished even before the mixing started. I believe that although plug-ins and expensive hardware can bring awesomeness and bliss on their own because they may sound better faster, they shouldn't be your most important tools. Making Phon taught me that almost anything can be done with very little, and although your Virus TI and your expensive tube compressor might sound good in solo, they still need a lot of work not to sound the same as every other Virus owner on the globe. So you'll have to re-sample them first.
Storyboard and inspirations
As usual we didn't have a storyboard when we started creating Phon. So to kick it off and get a few ideas going we started to exchange ideas on email. This resulted in some favorite flash videos being passed around as inspiration. After a few iterations of email exchange we gathered the ideas most likely to succeed, and created an ordered list of rough idea outlines. We then decided to not develop any of the ideas further but start on the first scene and see what would happen.
The ordered list of ideas:
1. Build a large cube from smaller cubes inspired by a flash video Kaktusen provided.
2. Do some synchro stuff inspired by Authechres PlyPhon but add splatting to the mix.
3. Pipes pumping up a hand.
4. A corridor where we can smash some greetings into the camera and show some volumetric light effects.
5. Clown Cathedral with big chains that fall to the ground.
6. A steam-punk inspired flower scene with mellow music and moody lighting.
7. A CubeStormer inspired scene that should have lots of blinking lights.
8. Crash some ribbons into a moving current of boxes.
9. Build end credits from triangles that walk along splines.
As you can see from this list there really is no common ground among the different ideas. To rectify this and "save the day" we did just like Prima Vera[2] and ignored this issue
The color scheme was inspired by some Anki King[3] paintings that Datsua had in his living-room. But we were never 100% satisfied with the grayish color scheme so we experimented a lot with different schemes on the first three scenes. But each time new colors were introduced we found that they took something away from the action. Thus we kept it gray to have the center of attention fixed on the main action.
[2] Prima Vera is a Norwegian comedy group that released a really incoherent movie called "Uten En Rød Tråd"
[3] http://www.ankiking.com
Animation
For basic animation we relied on Lightwave Layout and two custom scripts (BeatIt and PruneEnvelope). The BeatIt script is used to change the LWLayout time-line from the usual seconds/frames setup to a more convenient BPM setup. PruneEnvelope was used to do curve fitting on splines that had to many keys.
Before we started putting a scene together we always had a WIP of the music for that scene. This helped immensely when all the major sync points were put in place. Having the music also made it possible to change sounds and sync events in the song. One place we requested changes to the music was where the lights turn on in the greetings corridor. There were also change requests from the musician. One change Kaktusen wanted was a break where a voice would say Phon.
During scene animation we first did a rough sketch of all the object animations, light placements, and camera movements in Lightwave. This was then imported into our demo so we could get a feel for the final look. We then did a few iterations of "refine in Lightwave" and "view in demo" to get all the major sync points in place. When we were satisfied with the results we hard coded additional sync elements inside the demo.
For camera animations we added some perlin noise to the rotation angles to keep the camera movement from being too stale (stole the idea from Farbrausch). We also added triggers that would modify the camera position or the timeline on events like kick-drum beats.
ATI & NVIDIA
We encountered numerous incompatibilities between ATI and NVIDIA cards and in the end we chose to ignore these just to get the demo out the door.
At first the demo didn't run on ATI because it would not compile any of the shaders that utilized multiple color buffers. After that was fixed we didn't run the demo on any ATI cards until right before The Gathering. And then we got driver crashes which we weren't able fix before the compo deadline.
Closing words
The Phon "project" was a team-experience like we've never pulled off before and in its wake a lot of new ideas and enthusiasm emerged. And,.. Yes,.. We'll be back some time later this year.
this content item is from BitFellas
( http://www.bitfellas.org/e107_plugins/content/content.php?content.1808 )
menace, Sun 25 Jul 2010
The Making of Phon
by Datsua, Kaktusen and stGenius of PlayPsyCo
Download the pdf here
Introduction
In this article we're going to describe the process of creating the demo «Phon». We're going to show you some pictures from the development process, explain the technology we used and go over some of the problems that had to be tackled along the way.
The technology
The demo is built around deferred shading and Shader model 4.0. The reason being that we wanted to explore what could be done with lots of lights and geometry shaders. You can do deferred shading on SM3 but geometry shaders are only available in SM4 (and greater).
"WE WANTED TO EXPLORE WHAT COULD BE DONE WITH LOTS OF LIGHTS AND GEOMETRY SHADERS"
The deferred shading engine supports ambient lights, directional-lights, point-lights, capsule lights and shape-lights. The ambient and directional light types are pretty stock and explanations can be found all over the web. The other light types on the other hand have a few tricks up their sleeve.
The point-lights can have a light shaping cube-map. The cube-map look-up is done with the light direction and it's a nice feature to have when you want to fake light coming out from a sphere with holes, as can be seen in the second scene. The point-lights can also have a 1D color ramp that is sampled from the linear falloff factor (this wasn't used in Phon). The capsule-lights are based on a simple ray/capsule intersection test with linear falloff. This was used in the last scene to light up parts of the cube-streams.
The shape-lights are simple area lights with two 2D shape functions. The shape function parameters are linear interpolated as a function of the area-lights falloff. The interpolated parameters are then used by a super-shape[1] formula to check if the current fragment intersects the shape. The result from the intersection was then used to shape the light. This was used as a light source for the ground level windows in the cathedral scene. But it's really hard to see because of all the darn grass.
The deferred renderer also supports screen-space ambient occlusion, color bleeding and depth-offield. We tried to use these effects with discretion. So their impact on the displayed image is only visible when they are left out.
[1] Paul Bourke's Supershape page: http://local.wasp.uwa.edu.au/~pbourke/geometry/supershape/
Modeling
The 3D-models were created using Lightwave Modeler, and besides the Knife and the Bridge tools, all functions used have probably been around on every version since Lightwaves Amiga days. In fact a few of the objects in Phon are leftovers from earlier projects. The hand in scene 3 was made years ago by following one of the many "how to model a hand"-tutorials available online, so it might have been done on an Amiga, and all the objects in the last scene were made for Revolver. Those objects didn't make the final cut, so we found a place for it here instead. The models worth mentioning that were made for this demo are the cathedral scene, the flower-scene and the Rubics-cube solving robot-thingy.
The cathedral was probably the most time consuming scene to model as we tried approaching it by modeling generic building blocks that fit together and therefore could be used to build the cathedral in Lightwave Layout. We had an idea that this would give a better framerate than using one big object. In the end the gain turned out to be marginal, and so we redid the model as one building which, from a modeling point of view, is much easier.
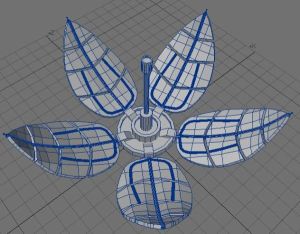
The method used was googling and looking at a few images of cathedrals, deciding which elements from each cathedral to use, and then making everything from memory to assure a bit of originality where the imagination had to fill in parts and details we could not remember. The flower was the first object created, and it looked like this.
During the design of the first scene we found that one of the flower-parts fit nicely into the first scene as it needed a bit more oomph, and the model was split in two. The leaves were created by deforming a disc. Then a grid of boxes were made and used in a Boolean subtract to divide the leaf into several parts. Next the object was manually subdivided using the knife-tool to get enough divisions for enabling bending of the object. To finish off, a few points were moved manually to get the right shape.
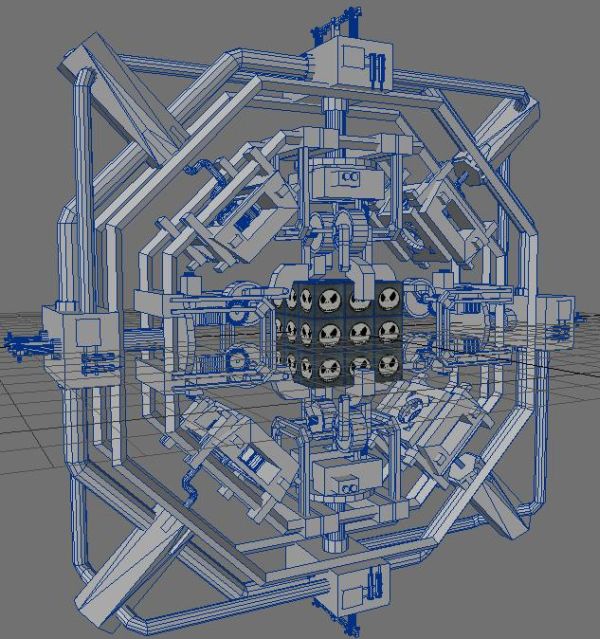
The Rubiks-cube scene came about after watching CubeSTORMER on YouTube. Again the method of just looking at it a few times and then creating something from memory/imagination was used. When doing mechanical objects you can't go wrong if you stick to 45 and 90 degree angles and add a few gears and joints.
To start off, the claws that handle the cube were made and scaled to the right size. Then the mechanics that operate the claws were added. Next it was all about making a skeleton to hold parts together and add more stuff. When it comes to mechanics you can get away with a lot of cloning of parts and the main goal is to make it look complicated, even if most of the parts don't have any actual function.
Textures
Making good looking textures in a short amount of time is hard and it's even harder for coders. Because of this we elected to go scavenger hunting through our previous releases. The textures we liked were then tweaked and combined in Photoshop CS 2. Initially we also wanted to have normalmaps for all the textures, but we ran out of time before any of the normalmaps were created. This was the penalty of doubling as coder and texture-masher instead of adding a dedicated graphics guy to our team.
To keep the color scheme under control we created UnDutchify. This is a C# CLI tool for color matching against a reference image and it was used to keep our textures within a specific color scheme (bluish gray with hints of red, green, and orange).
Music
Regarding music, the wish list was clear from the beginning: the nowadays seemingly ubiquitous dubstep prepared for heavy sync with a tad of industrial. On a personal note, the making of this track was more of an experiment for me. Fiddling with thoughts and techniques on a whole new level rather than doing the perfect production. It was also used to test the seemingly endless amount of power available from the long sought-after, nuclear DSP-reactor UAD-2 Quad.
Disclaimer: Things might get pretty messy and complicated here, but as Phon's music was a cutting edge lab-rat, we decided to write it this way, hoping that any fellow sound geek will find it useful.
Tools of the trade
For the production itself, DAW's used was Ableton Live 8, Propellerheads Reason 4, Record and ReCycle, together with Cycling '74 Max for Live, Native Instruments Kore 2, Komplete, 4, 5 and 6, ReFX Nexus 2, AudioDamage Kombinat multiband distortion, dBlue Glitch, DestroyFX Buffer Override and Antares AutoTune 5. In addition, Universal Audio's UAD-1 Ultra Pak DSP-card with plug-in collection was used, as was a newly apprehended UAD-2 Quad card. Extra plug-ins used were Moog Multimode Filter, Empiric Labs Fatso and Precision Multiband Dynamics. Steinberg Nuendo 3 was used for stem-mix, and both WaveLab 6 and Ableton Live were used for stem-editing, mixing and mastering.
Hardware used was M-Audio ProFire 2626 audio interface, BX8 monitors and SBX10 sub for monitoring, Presonus Monitor Station and a Røde NT1-A condenser mic with pop-filter. M-Audio Keystation Pro-88 keyboard, AKAI APC40 Ableton Live controller and MPD24 drum pad was used for MIDI input, although the APC40 was used as a hands-on mixer and not for any recording.
Structure and arrangement
Usually, a tune is made by first composing a hook, beat, melody or similar, anything that captures the idea of both the title and the sound wanted. Then a skeleton is constructed around this to get a sense of length, sequences, and internal movements to make a list we could follow. At this point, we didn't know much, so the song was started out straight with an intro with a buildup to a beat, without any plan other than a vague feeling. Datsua and stGenius started working on the first draft, and when it was done I added a draft of the first change; the sequence with the acoustic drums. After this, we went back and forth, adding new sync-able parts to the song as design progressed, and working towards a 4 minute length to be humane to ourselves. As the song length was complete, so was the main list of parts, and we started working small while adding more sync points and details both in music and direction. Sometimes parts of the soundtrack inspired changes to the graphics, and vice versa, making it a very fluctuating process.
Sound design
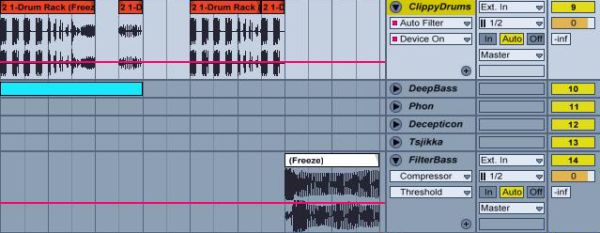
Freezing tracks (a method primarily used to preserve CPU power by bouncing a selected track down to an audio file rather than processing it in real-time) was used extensively together with a similar technique called resampling. Although not for the purpose of preserving resources (not with the UAD-2 Quad in place anyways, baha), but for the control audio editing provides to create effects and edits not so often heard in electronic based music.
Resampling allows the really geeky sound designer to realize all manner of wet, glitchy dreams, and is a must for the surgical OCD-control (yeah, really) this sound geek needs to fulfill his dreams. It's also necessary to generate the kind of red thread effects needed, as there are very few samples from libraries in the soundtrack. Put short, most sounds you hear in Phon are often first created with MIDI and VST or microphone input, then bounced down to audio files and altered. Sometimes frozen files are duplicated to new tracks for adding more effects, further re-sampling, and even more editing. The main bass line has 8 permutations on different tracks happening at different points, all generated from a single MIDI track with N.I. Massive using envelopes, and sometimes entire parts of the song got re-sampled through the master channel, loaded into a MIDI sampler (Lives native Simpler or N.I. Kontakt 4), messed up, cleaned up and then re-sampled to its own audio track for even more editing.
For the order of things, freezing will be referred to as re-sampling throughout this article. The drum loop was the first to be made, and this is one of the few elements in the song that uses samples from a library. The beat was recorded with the MPD24 MIDI drum pad and the native Live Drum Rack with 50% quantization to 16ths to maintain a loose feel, and was recorded 8 bars long to get enough variations and breaks. It was then mixed and "mastered" inside Live with UAD plugs Cambridge EQ, overdriven slightly into the Moog filter, tightened up with the Precision Multiband dynamics, beefed up with Fatso, and mushed for proper loudness into the Precision Limiter. The loop was then re-sampled to an editable audio region on an audio track, and was used throughout the entire song, both for beat variations, and a different kind of effects.
One of the effects is the distorted beat used during the intro and the dubstep parts, where the resampled drum loop was copied to a new track. Distortion was then added with Lives Saturator plugin, adding automation to the base frequency to color different frequency bands seamlessly. This was then again re-sampled, copied to a couple of new tracks, doing a large amount of hand editing to vary from the straight beat itself to reverberated parts, glitch percussion during the dubstep and reverse vinyl-style effects.
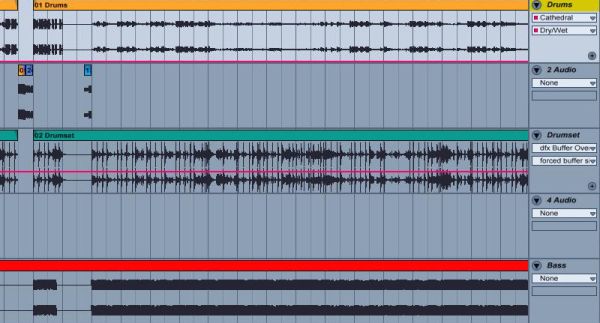
The acoustic drums were first recorded with MIDI and N.I. Battery 3 using the MPD24 once again, and as a drummer, it was crucial to keep track of how many arms and legs one can use at the same time to achieve an authentic style. Many musicians tend to just mash in more notes than a single drummer possible could play, and without the proper consideration of the velocity of the hits. Because Battery 3 has more sounds mapped out then what fits on the 16 pads of the MPD24, the drums were recorded in two takes, one to the main beat and one to the cymbals. When satisfied with the beat, it was split up into different tracks to simulate the same mic setup used when recording a real drum kit, with separate tracks to kick drum, top and bottom snare drum, toms, hi-hats, stereo overhead mics, ambience mics in the back of the room and for fun, a mic in a trashcan behind the chair of the drummer. Sounds were soloed in Battery and recorded to their respective tracks, edited and mixed with EQ, reverb and compression to simulate their purpose more faithfully. When the entire kit sounded proper, a separate re-sample of the entire drum kit stem was made for effects and alike. A return bus with hard compression was also set up for New York-style parallel compression, and a lot of glitch editing was made on the tracks themselves to keep it detailed, but anonymous. Most notably is Fibonacci sequence-stuttering on the snare drum and the hi-hats (not the cymbals) to achieve more lovely quirkiness.
The ethnic vocal sounds were made by yours truly chanting in a microphone, routed to AutoTune locked to scale with maximum retune speed, processed on two different tracks processed with Guitar Rig 4, one used during the factory sequence with a wide stereo image obtained by using different distortion modules in the left and right channel, and one with an almost mono distortion and an automated talk wahwah-module with a huge reverb during the tunnel and cathedral sequences. The reason for using a large reverb and almost mono source was to complement the gnarly, mono bassline, which is an instance of Massive using tons of envelopes and performers to move the sound, and Kombinat to f**k it up.
Although the vocal wasn't re-sampled to any effects itself, the return of the reverb was recorded 100% wet to its own track, reversed, time stretched, pitch shifted and otherwise raped to become the voicy reverse fades used throughout the track. The basses were in turn destroyed and re-sampled, where the main method consisted of duplicating the track, adding distortion and filtering in either order, and once again re-sampling this material to new tracks with new effects, typically high pass-filtering, delay and reverb. Using these as my main source of material, very little was added other than some glockenspiel and a very airy synth during the flower sequence. It's also worth mentioning that almost every time re-sampling was done, some form of EQ and compression were added before the actual bouncing, to save time and preserve energy in the mix.
"THE EXCUSE 'I'LL FIX IT IN THE MIX AND MASTER' RARELY WORKS"
This is all part of attempting to make the song sound "like itself" and not a sequenced library of presets and samples. When the song was mainly finished in its first form, notes were taken on different parts to be edited and glitched up later, and all tracks were exported to single 24 bit 48khz .wav files for mixing in Nuendo. It is important to note that the song sounded quite good at this point, and that the excuse "I'll fix it in the mix and master" rarely works (at least not for me) as everything gets harder as faults catch up.
Editing and mixing
Once imported into Nuendo, some minor editing was done to different elements before the actual mixing began (like editing the return of the reverb channel for those absolutely dead stops) and cleaning up any abnormalities not needed or wanted. All tracks were sorted and routed to group busses, summing drums into one stem, basses into another, leads, pads, FX, and so on. The only exception is that the deepest basses and the low end of the drums who got summed into its own bus. The low range of the drums were separated into its own track at 100hz using the band separation on the Precision Multiband Dynamics, and the top range were treated with the 36db/octave hipass filter on the Cambridge EQ. The EQ was used rather than the remaining bands on the Multiband because the bass part would receive very different processing, and an adjustable cutoff frequency on the high pass filter made it possible to avoid spectral separation. It also allows a higher degree of editable control both in terms of "tightness" and energy distribution in the mix, and in viewing the entire bass range of the song as a single groove rather than just a part of 25 other elements creating the whole. It also makes it easier to remove any rumble in other elements of the track, as the entire low end of the song is controlled in the bass-bus. Therefore, all other tracks were consistently cut with a high pass between 100 and 250hz.
Some musicians might argue that this is the downside of working with entire drum loops rather than keeping e.g. the kick drum on its own track. This might be desirable on some productions, but in this case it opened up possibilities like being able to do spatial editing on the drums without losing a defined bottom.
The song was then mixed in an ordinary fashion, and each of the stems received a light mastering before getting exported back into Live for further mangling.
Stem editing
It is in the stem editing that most of the "global-yetnot" glitching was made, processing and re-sampling the stems once again to both create buildups and releases of energy. This is done because stems are a place in between the single track and a master track, allowing seamless processing. Typical processes used throughout are, automating a reverb dry/wet curve or gradually adding distortion, and stereo widening to the mid band using Kombinat together with a high pass filter sweep towards a break or buildup to create anticipation and dynamics in spatial space. This also sounds tighter because the bass is on its own track, unaffected by the reverb or distortion sweep. At one point, one of these stem-sweeps were even re-sampled to its own track, treated with EQ and time stretched to a fourth of its tempo using Lives Texture audio warp mode to achieve a really grainy sweep. Most of the glitchy parts were done in this manner, mostly by hand editing and with Lives native time stretching and pitch shifting, but also by re-sampling dBlue Glitch and Buffer Override, editing them further for a perfect fit. This is also because automated plugins on master or stem busses tend to change dynamics or gain when self-oscillating, and having re-sampled audio makes it possible to blend, crossfade, and mix processed regions with hand edited ones to avoid the effects and transitions from sounding unnatural.
Mastering
With the first mixing and the stem editing and mixing done, the master channel was then exported into a new Live project without any additional limiting, EQ'ing or compression, and imported to two identical tracks for M/S (mid/side) mastering. This is done by phasing out all the mono content on one bus using reverse panning and phase shifting, and all the stereo on the other, leaving the difference between stereo and mono on two tracks for both editing and processing. The mono track received heavy multiband compression, with emphasis on the bass range. A tight attack value of 29ms was used to emphasize transients, and a release of about 350ms with maximum compression around 9db. The other ranges varied between attack 50-70ms and release from 120-400ms, with an overall maximum compression of around 3db, with the main focus on improving punch in the low and high-mid ranges, reducing mid and low-mid clutter. Fatso was then used to soften the treble with tape compression and warm the track with extra harmonics added from the simulated transformer circuitry.
The track with the stereo differential didn't receive any compression at all, but a very subtle and lush reverb together with a light phase linear EQ boost at 10khz and a minor dip at 3.2khz. The entire track also got a 1.5db gain to really force the stereo image through. After this, both of the tracks had their volume automated on the parts already edited in the stem-session. Adjusting the volume on the mono and stereo material separately, together with changing the entire low end, and making sweeps on the "upper" stems, made it possible to gently drop down to total mono towards a break. Together with "lifting" it by gradually removing the bass by volume fade (rather than frequency sweep because the volume fade sneaks up on you rather then telling you "HERE COMES THE LIFT"), the song moves down to a very low level with almost no bass energy and a mono image, yet defined and clear, to a full wide panorama spectrum with all frequencies blasting off. All of this is 100% transparent, and is mainly possible by using nothing but the song itself to create the effect as opposed to using samples on separate tracks.
After this, at last, the pre-master is exported from Live to WaveLab 6 for minor pan and loudness normalization, some gentle saturation from the Fatso, and maximized using the Precision Limiter and adding dithering before being saved as a 16-bit master .wav file and converted into the final MP3.
Morale
Although a bunch of really cool plug-ins were used on this track, it is important to note that the song, for most ears, was finished even before the mixing started. I believe that although plug-ins and expensive hardware can bring awesomeness and bliss on their own because they may sound better faster, they shouldn't be your most important tools. Making Phon taught me that almost anything can be done with very little, and although your Virus TI and your expensive tube compressor might sound good in solo, they still need a lot of work not to sound the same as every other Virus owner on the globe. So you'll have to re-sample them first.
"AS USUAL WE DIDN'T HAVE A STORYBOARD"
Storyboard and inspirations
As usual we didn't have a storyboard when we started creating Phon. So to kick it off and get a few ideas going we started to exchange ideas on email. This resulted in some favorite flash videos being passed around as inspiration. After a few iterations of email exchange we gathered the ideas most likely to succeed, and created an ordered list of rough idea outlines. We then decided to not develop any of the ideas further but start on the first scene and see what would happen.
The ordered list of ideas:
1. Build a large cube from smaller cubes inspired by a flash video Kaktusen provided.
2. Do some synchro stuff inspired by Authechres PlyPhon but add splatting to the mix.
3. Pipes pumping up a hand.
4. A corridor where we can smash some greetings into the camera and show some volumetric light effects.
5. Clown Cathedral with big chains that fall to the ground.
6. A steam-punk inspired flower scene with mellow music and moody lighting.
7. A CubeStormer inspired scene that should have lots of blinking lights.
8. Crash some ribbons into a moving current of boxes.
9. Build end credits from triangles that walk along splines.
As you can see from this list there really is no common ground among the different ideas. To rectify this and "save the day" we did just like Prima Vera[2] and ignored this issue
The color scheme was inspired by some Anki King[3] paintings that Datsua had in his living-room. But we were never 100% satisfied with the grayish color scheme so we experimented a lot with different schemes on the first three scenes. But each time new colors were introduced we found that they took something away from the action. Thus we kept it gray to have the center of attention fixed on the main action.
[2] Prima Vera is a Norwegian comedy group that released a really incoherent movie called "Uten En Rød Tråd"
[3] http://www.ankiking.com
Animation
For basic animation we relied on Lightwave Layout and two custom scripts (BeatIt and PruneEnvelope). The BeatIt script is used to change the LWLayout time-line from the usual seconds/frames setup to a more convenient BPM setup. PruneEnvelope was used to do curve fitting on splines that had to many keys.
"BEFORE WE STARTED PUTTING A SCENE TOGETHER WE ALWAYS HAD A WIP OF THE MUSIC FOR THAT SCENE"
Before we started putting a scene together we always had a WIP of the music for that scene. This helped immensely when all the major sync points were put in place. Having the music also made it possible to change sounds and sync events in the song. One place we requested changes to the music was where the lights turn on in the greetings corridor. There were also change requests from the musician. One change Kaktusen wanted was a break where a voice would say Phon.
During scene animation we first did a rough sketch of all the object animations, light placements, and camera movements in Lightwave. This was then imported into our demo so we could get a feel for the final look. We then did a few iterations of "refine in Lightwave" and "view in demo" to get all the major sync points in place. When we were satisfied with the results we hard coded additional sync elements inside the demo.
For camera animations we added some perlin noise to the rotation angles to keep the camera movement from being too stale (stole the idea from Farbrausch). We also added triggers that would modify the camera position or the timeline on events like kick-drum beats.
ATI & NVIDIA
We encountered numerous incompatibilities between ATI and NVIDIA cards and in the end we chose to ignore these just to get the demo out the door.
At first the demo didn't run on ATI because it would not compile any of the shaders that utilized multiple color buffers. After that was fixed we didn't run the demo on any ATI cards until right before The Gathering. And then we got driver crashes which we weren't able fix before the compo deadline.
Closing words
The Phon "project" was a team-experience like we've never pulled off before and in its wake a lot of new ideas and enthusiasm emerged. And,.. Yes,.. We'll be back some time later this year.
this content item is from BitFellas
( http://www.bitfellas.org/e107_plugins/content/content.php?content.1808 )